Get Support
+44 (0) 7478 272574
-
By: admin
- 0 Comments
First of all you should realize that the way the Sachs engine is designed, it is impossible to have shifting or jumping-out-of-gear problems. But, since this appears to be happening to many club members, we should look at the possible causes:
Jumping out of gear can be caused by 4 different conditions:
1. Improper shifting
2. Neutral select cable misadjustment
3. Worn gears
4. Shaft end-play
Each of these items will be discussed but first we should understand how the transmission operates. The shifting lever on the transmission operates a ratchet that positions the gears for different speeds. The engine drives the layshaft which has a 1st and 4th gear at each end that is firmly connected to the layshaft.
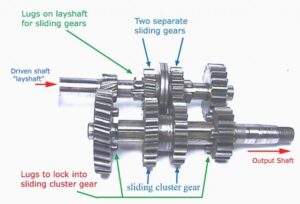
In the center are 2 separate sliding gears (2nd & 3rd gear) that are driven by the layshaft when they are positioned over lugs on the layshaft. The output shaft is ‘splined’ and has a sliding cluster gear which is continually meshed with the sliding gears on the layshaft. All these sliding gears are moved laterally as a group when the transmission is shifted. There are holes in the side of the sliding cluster gear that ‘lock onto’ lugs of the end gears of the output shaft when in 1st and 3rd gear.
First Gear
The gears are shown in the 1st or low gear position. Gear 1 is a machined part of the layshaft. It meshes with gear 2 which is free to rotate on the output shaft. Gears 2and 3 are ‘locked’ together by lugs on gear 2. Gear 3 turns the ‘splined’ output shaft.
Second Gear
In 2nd gear, the loose sliding gear 1 is driven by ‘dogs’ on the layshaft. This in turn drives gear 2 of the cluster gear which in turn drives the output shaft.
Third Gear
In 3rd gear, the other loose gear 1on the layshaft is driven by a different set of dogs on the layshaft. This gear drives cluster gear 2 which in turn drives the output shaft 3.
Fourth Gear
The large gear 2 is ‘pressed’ onto the layshaft and is permanently connected. This drives loose gear 3 which has locking lugs that fit into cluster gear 4.
Shifting
A shaft from the shifting arm connects to the ratchet assembly. The top of the ratchet assembly moves the selector fork to the different gear positions and the pawl holds the fork in place. The neutral selector is used to force the pawl out of the selector fork and allow the gears to go to a neutral position. An inexpensive new pawl spring will help hold the pawl in the selector fork notch. Using a stronger spring is not necessary and would only make it harder to shift gears.
Getting into gear
A shaft from the shifting arm connects to the ratchet assembly. The top of the ratchet assembly moves the selector fork to the different gear positions and the pawl holds the fork in place. The neutral selector is used to force the pawl out of the selector fork and allow the gears to go to a neutral position. An inexpensive new pawl spring will help hold the pawl in the selector fork notch. Using a stronger spring is not necessary and would only make it harder to shift gears.
In both cases, the pawl is definitely in the notch and when the shifting lever is released, the spring will pull the pawl down to the bottom of the notch. Now you are firmly in gear. If the pawl is not equally positioned in both directions, it will be necessary to move the pawl left or right by adding or removing eccentric shims from the pawl assembly.
Now that the shifting is correct it will be necessary to position the gears in relation to the shifting fork. Here the pawl is in the center of the selector fork between 2nd and 3rd gear. The loose sliding gears are positioned between the 2 sets of dogs on the layshaft. If the clearance on either side is not equal, the layshaft will need to be repositioned by adding or removing spacers between clutch bearing and the and the 1st gear. Try to keep these spacers as thin as possible to prevent binding of the layshaft when the transmission halves are firmly bolted together. Actually, the helical first gear can rest on the inner race of the clutch bearing.
Here the gears are shown with the loose layshaft sliding gears resting on the layshaft 2nd gear dogs. The layshaft 1st gear may have a spacer under it or it may be resting on the clutch bearing. The driveshaft 1st gear hould have a spacer under it so it doesn?t rub on the transmission case. Both gears should mesh so that they are properly aligned.
When the gears are moved to the 1st gear position, the sliding cluster gear should be touching the driveshaft 1st gear. This will allow the knobs on the driveshaft 1st gear to be fully seated into the holes on the sliding cluster gear. A small space can be tolerated but try to keep it as small as possible and make sure that the driveshaft 1st gear is not touching the layshaft sliding gear when shifted into 1st gear.
The sliding gears for 2nd and 3rd gear have been positioned over the dogs on the layshaft by the selector fork. If spacers have been added or removed under the layshaft 1st gear, it may be necessary to add or remove eccentric washers at the neutral selector assembly to get the proper clearances between the loose sliding gears and the dogs on the layshaft when in neutral. When the gears are positioned in 4th gear, the sliding cluster gear is positioned by the selector fork and should lock-in to the 4th driveshaft gear as much as possible.
The sliding cluster gear should not be touching the 4th layshaft gear.
The overall layshaft distance should should be less than the space between the crankcase halveswhen everything is bolted together with the proper thickness crankcase gasket.
The final adjustment is made by placing shims (spacers) on top of both 4th gears to get the proper endplay in each shaft.
Endplay for the layshaft should be:
.05mm—.10mm (.002″—.004″)
and for the output shaft:
.10mm—.20mm (.004″—.008″)
If there is any ‘binding’ of the layshaft, it may be necessary to have the layshaft 4th gear pressed further onto the shaft and start all over.
Neutral Selector Adjustment
Neutral selector operation is quite simple. Pulling on the cable rotates the selector and forces the pawl out of the selector fork. It has a return spring. The other spring is only used to keep the cable end captured.
Adjustment can be made at the engine or at the finger lever on the shifter in the cockpit. I find that the easiest and best way to adjust is by pulling on the cable and clamping it in the finger lever. This way you can feel when you have taken all the slack out of the cable and are not moving the actuator. If you adjust at the engine end of the cable, you cannot tell if the actuator is beginning to force the pawl out of the selector fork.
When properly adjusted, with the engine in gear, you will hear a ‘click’ back at the engine when the finger lever is squeezed. You can also check the amount of movement of the finger lever after you hear the click to insure that it is not just on the edge of releasing.
Worn Gears
The sliding gears on the layshaft become worn and are mostly responsible for jumping out of 2nd and 3rd gear problems. The ‘dogs’ on the layshaft fit into the sliding gears and they also become worn. The photos show worn layshaft dogs and a badly worn sliding gear. This wear can cause the sliding gear to move laterally and jump out of gear.
New Gear
The dogs on the layshaft will also wear as shown in the photo and the gear should be replaced if you can find one in decent condition. On this layshaft you can see that quite a bit of the dog has been worn away.
With gears like this it is understandable why the selector fork can’t hold the gears in position under heavy loads.
Another problem with worn gears are elongated holes on the output shaft sliding cluster gear and the knobs on the output shaft 1st and 4th gear.
These problems are not as serious as the 2nd and 3rd gear problems but still may cause jumping out of 4th gear under load.
Final Word on Gear Problems
If you have problems with grinding gears when shifting or jumping out of gear, FIX IT NOW! The problem will only get worse until the gears are totally destroyed and it is almost impossible to replace them.
Another problem is getting spacers (washers, shims) for the shafts to get the proper end-play. I have never found a source for these spacers and had to make them by hand which is no easy task. If the shafts have too much end-play, continual lateral vibration can cause the gears to ‘walk’ out of position.
I would also suggest that anyone working on the engine get publications from Partsmart.
These are:
1805 Sachs parts list
1806 KR200 workshop manual
1807 Engine manual